Hello Everyone,
I guess I should have introduced myself many moons ago! I want to start by saying thank you for following me on my gluten free journey! being Celiac is very difficult but I am almost to the point of feeling comfortable in my own skin again. I was diagnosed with Graves Disease in 2001 and it all happened from there. As I progressed to the point of almost feeling myself again I found that eating certain foods reacted in my system.
So, here I am eating Gluten free and feeling so much better and wishing I had of figured out my problem years ago.
I don't drink this Café Mocha anymore because coffee and I don't see eye to eye unfortunately! But it is g-free and so Yummy I had to share. Enjoy!
Café Mocha
Makes 4 servings
What you need:
· 1/4 Cup water
· 3 Tablespoons brown sugar
· 2 Tablespoons cocoa powder
· 4 cups strong, hot coffee
· 4 Tablespoons whipped cream for garnish if desired
Direction:
What you do - Put water, brown sugar and cocoa powder in saucepan and heat over medium-high heat. Stir frequently while bringing to a boil. Boil for 5 minutes until thick and smooth. Spoon 2-3 teaspoons of cocoa mix in each of 4 coffee mugs. Pour hot coffee into each mug, filling close to the top. Float a dollop of whipped cream on the top of each mug (if desired).
YUMMMMM!!!!
Thursday, May 27, 2010
Gluten the Hidden Grain

It's very easy for someone to say "you have celiac disease...you can't eat gluten anymore!"
But, it is very hard to go G-free. I am still struggling with the change because gluten is everywhere. It is hidden in places you would never think gluten would be, just like sand after a nice long day at the beach by the end of the day you have gritty sand in places you wouldn't think sand should be. Your day was enjoyable just like the amazing meal you just ate but wait 20 minutes and you feel the effects, although gluten's affects are longer lasting. I have changed the way I buy and cook food when grocery shopping in that I buy pure and natural vegetables, fruits and meats, even organic sometimes but it is hard to overcome this feeling of dread for the next meal.
My children are not G-free which makes it hard when cooking and baking. I don't have that down yet which I should since it has been several years. This is so difficult for me because I am an organized person and it stresses me out that I can't make it work. I have tried a schedule, post it notes, dry erase boards, binders with dividers, and a few other forms of organization, even unorganized meals and only on occasion it works. I breathe a sigh of relief thinking maybe this will work but next time usually the next day to my utter horror it fails yet again.
I can't force myself to get past the fact that I can't go into my local grocery store and buy almonds in case they went down a conveyer belt, which had a form of gluten on it. I am forced to go out of my way to buy foods that are much more expensive because I can't eat the normal North American foods. Where is the break in eating costs for people who have to live like this to be healthy but are in no way able to afford it? In other posts I talk about how to save money in different areas around the home so that the money can shift to the G-Free foods but there is only so much one can do.
I use the variety of popular gluten free cook books that are on the market today but find it overwhelming and time consuming to purchase and even harder yet, find most of the ingredients needed to make the foods, just so I can save some money. The amount of time it takes to prepare the foods can be ridiculous, who has that kind of time? I don't, although I would like to able to take the time and cook just one of those gourmet meals. It's just not the way I want to spend my time. I am a hearty meal, meat and potatoes girl, cooking in one pot is even better. Less to clean which gives me more time for my family and myself!
Life is to short to waste on stress and making as much money as you can, I'd rather have no stress, just enough money to get by but live my life to the fullest by having fun and doing what I love!
Find the hidden gluten in foods you may be eating but can't figure where the culprit is...
Wednesday, May 19, 2010
Changing my life style is what I need to do!
It's time to switch it up!
I have come to the conclusion that I need to change my daily routine, sleeping pattern, what I eat, my non-existing exercise regimen, and taking time away for myself. In doing this I will be creating a living atmosphere that will benefit everyone around me.
I am going to start this journey tomorrow!
I was sitting on my couch wondering why I don’t feel good the majority of the time? Why am I always tired?
Finally I asked myself … What can I do about it, I don’t want to waste another 7 years feeling crappy and wonder what I should have done!
So, I am changing the way I eat, sleep, exercise, and pamper myself!
I am going to start with exercise by walking every day.
As I am slowly working up my endurace I will reseach, study and learn how to eat properly. I am going to start by following this DIET.
I went to the library yesterday and got the Cook Right for your Type
& Allergies: Fight it with the Blood Type Diet also by Dr. Peter J. D'Adamo.
I already own Eat Right 4 Your Type which has helped me realize that I can do something about my symptoms. I am so happy that I have found a diet to free me from waking feeling poorly and going to sleep feeling poorly.
My biggest goal is to make this happen so that I can continue the patterns I develop now to last throughout my life. Keeping these NEW habits in place so that they are just natural to me will be the main focus for a healthier life. That way it won't be a struggle everyday, it will just be my...routine!
Tuesday, May 18, 2010
Stemmler Meats & Cheese
Sometimes I get so down and frustrated that there is so little that I can eat. The constant nagging in my head every time we go out and I can't eat anything, every time I turn around and find that I have a something else I can't tolerate. Even the fact that too much rice grain in any form can be dangerous. So, this is my ploy to find recipes that are G-Free but also have a variety of ingredients so that I don't end up with a yeast over growth or another disease!
I feel it is important to eat natural foods, organic if possible. I shop at Stemmler Meats & Cheese where I can find fresh delicious natural foods. The meats have no gluten, no lactose products and no monosodium glutamate (MSG), they use other seasonings to increase flavour instead of MSG.
Stemmler's is located at 3031 Lobsinger Line, Heidelberg,
Ontario. Tel: (519) 699-4590
Hours of Operation:
Monday - Wednesday 8am - 6pm
Thursday - Friday 8am - 8pm
Saturday 7:30am - 5pm
Five years after our doors opened we expanded to our current size of 2300 sq. ft. Even though our industry had some hard times, we continued to thrive by not cutting any corners. We developed several products which did not included flour or milk. This seemed to accommodate a lot of people with intestinal disorders. Members of the Celiac Society have been referred to our store by their attending Physicians.
Check out their web site...
Wednesday, May 5, 2010
After Glow Cosmetics
AFTER GLOW: Afterglow Cosmetics founder, Kristin Adams' mother and sister are both have celiac disease and must avoid all things containing gluten – including cosmetics and personal care products. She has watched them struggling for years to find truly natural and gluten free cosmetics. When Afterglow Cosmetics was born, naturally, Kristin made sure that none of the ingredients used to formulate her line of cosmetics contained gluten.
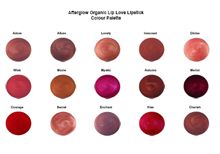
Beyond being completely gluten free, the Afterglow line offers a very wide range of color cosmetics from 20 shades of Organic Mineral Foundation to 15 shades of Organic Lip Love lipstick, countless shades of matte and shimmer eye shadow, blushes and bronzers, beautifully natural mascara, lovely liners and gorgeous glosses. Afterglow Cosmetics is an early 'Compact Signer’ for the Breast cancer Fund's 'Campaign for Safe Cosmetics' and formulates within this safer cosmetics standard.
Read review...
Wow, look what they left out of their ingredients!!!! Not just GLUTEN but other harmful chemicals.
•NO TALC
•NO GLUTEN
•NO BISMUTH OXYCHLORIDE
•NO CORNSTARCH
•NO MERCURY
•NO PARABENS
•NO SYNTHETIC PRESERVATIVES
•NO SOY
•NO MINERAL OIL
•NO PETRO-CHEMICALS
•NO CARMINE
•NO PHTHALATES
•NO FD&C AND LAKE DYES
•NO FRAGRANCE
Check it out!!!
AFTERGLOW COSMETICS IS 100% GLUTEN FREE

Why did we make ALL our products gluten free?
We have a very personal story behind our gluten free products. Creating fabulous, gluten free makeup is a personal mission for Afterglow Founder, Kristin Adams' who's mother and sister both have Celiac Disease and must avoid all things containing gluten–including cosmetics
and personal care products.
She has watched them struggling for years to find truly natural and gluten free cosmetics. When Afterglow Cosmetics was born, naturally, Kristin made sure that none of the ingredients used to formulate her line of cosmetics contained gluten.
Read more...
As far as I'm concerned I feel naked if I leave the house without lip gloss or lip stick! Check out the colour variety AfterGlow Cosmetics has.
Tuesday, May 4, 2010
G-Free Goop & Finger Paint
Goop!!!
Keeps children busy for hours! (And it's cheap!) Simply place 1 cup of cornstarch in a large flat dish (a metal baking pan works the best) and add water a little bit at a time until "goop" is formed. It should not be too watery and not at all powdery – the consistency of clay. The goop will feel hard when the child picks it up and then will turn to liquid in their hands. The activity works best when the dish is a different colour from the goop. Try adding food colouring to the goop for even more fun! Easy clean up.
Homemade Finger Paint
Recipe:
Ingredients: 1/2 cup cornstarch, 3 tbsp sugar, 1/2 tsp salt, 2 cups cold water, food colouring if desired.
Place on finger paint paper and away you GO!!!!!!!
Erupting Volcano ~ G-Free~ Arm and Hammer!
Erupting Volcano
Build Your Very Own Volcano and Watch It Erupt!
This is an old favourite that's a staple at Science Fairs—-it's so popular because it's so reliable and easy! You can do this in the sink just to see the 'lava', or make the volcano as directed below.
Remember the importance of adult supervision, especially with young children.
Supplies needed:
cardboard
plaster-of-paris
4 oz. plastic cups
red food colouring
water
ARM & HAMMER® Baking Soda
hand dishwashing liquid
vinegar or citric acid (sour salt)
Making the Volcano:
Step 1: On a baking sheet or other easily cleaned surface, shape cardboard into broad cone shape, using a 4 oz. cup to form the "crater" at the top of the volcano.
Step 2: Use the plaster-of-paris over the cone to form the volcano. Do not get plaster in the crater. Allow volcano to dry completely.
Step 3: Paint or decorate volcano as desired. If you would like your volcano to stand up to repeated eruptions and clean-ups, consider using non-water soluble paints.
Making the Eruption:
Step 1: Mix ¼ cup vinegar (or 1 teaspoon citric acid) with dishwashing liquid, water and red colouring in a plastic cup
Step 2: Put 1 teaspoon ARM & HAMMER® Baking Soda in an empty plastic cup. Place this cup inside the volcano crater.
Step 3: Quickly pour vinegar/dishwashing liquid/water mixture into the ARM & HAMMER® Baking Soda cup in the crater. Enjoy the lava as the volcano erupts!
Explanation:
The ARM & HAMMER® Baking Soda reacts with the vinegar (or citric acid) in the mixture and produces a gas, carbon dioxide (CO2). As the gas is released it bubbles through the dishwashing liquid, creating the bubbly, red lava.
Variations:
Experiment with different mixes of vinegar/dishwashing liquid/water solutions or slurries of the ARM & HAMMER® Baking Soda. Vary which component is added to the crater first, to create different visual effects.
Play Clay ~ G-Free ~ Arm and Hammer!
FOR KIDS:
Play Clay
The homemade modeling clay that becomes permanent after drying. Three simple ingredients you'll find in your kitchen combine for virtually unlimited creative possibilities for kids of any age. Great for rainy days, birthday parties and class activities. Since it's made of foodstuffs, it's safe, non-toxic and economical!
And don't forget the importance of adult supervision, especially with young children.
What can you do with Play Clay?
Roll it, cut it, shape it, mold it, squeeze it! Use Play Clay to make decorations and ornaments, jewelry and gifts, magnets and boxes! And more!
Play Clay Recipe (Adult supervision required!)
2 cups ARM & HAMMER® Baking Soda
1 cup corn starch
1¼ cups cold water (add food colouring to colour clay)
STIR together ARM & HAMMER® Baking Soda and Corn Starch in saucepan. Add water and cook over medium heat, stirring constantly, until mixture reaches consistency of moist mashed potatoes (approximately 10-15 minutes). If clay is cooked too long, finished crafts may crack.
REMOVE mixture to plate and cover with a damp cloth. When Play Clay is cool enough to handle, pat until smooth. Now you're ready to make fun shapes!
DRYING:
Air: Place finished objects on wire rack. Dry overnight (8 hours).
Oven: Pre-heat oven to lowest setting. Turn oven off, and then place finished objects on a cookie sheet in oven for 10 to 15 minutes.
Microwave: Place finished object on paper towel. Bake at medium power for 30 seconds; turn crafts over and bake for 30 seconds more. Repeat until Play Clay is completely dry. Let cool before handling.
DECORATING:
Coloured Clay — When mixing Play Clay recipe, substitute food colour for some of the water to create fun, festive colours.
Paint — Paint dry pieces with watercolour, poster or acrylic paints. Apply glitter to wet paint. Use felt-tip pens or waterproof marker for drawing and glue to apply details.
Decorative Elements — Many objects found around the house and yard will help create unique Play Clay crafts. Use buttons or coins to imprint a pattern on a craft. Or accent a design with beads, macaroni, leaves, shells or bark. Either place the decorations on Play Clay while it's soft or apply with glue to dried craft.
FINISHING: Protect finished Play Clay objects with clear acrylic spray paint or clear nail polish.
STORING: Store any unused Play Clay for up to one week. Simply place in a tightly sealed plastic bag or container and refrigerate. Do not freeze. Bring to room temperature before using.
Subscribe to:
Posts (Atom)


